> ## Documentation Index
> Fetch the complete documentation index at: https://docs.cystack.net/llms.txt
> Use this file to discover all available pages before exploring further.
# Sao lưu dữ liệu
> Hướng dẫn thiết lập kho lưu trữ và sao lưu dữ liệu
**Trường hợp sử dụng**
* Trường hợp laptop bị hỏng ổ cứng hoặc bị đánh cắp, có bản sao dữ liệu mới nhất để phục hồi, giúp nhân viên quay lại làm việc nhanh chóng.
* Thiết bị bị mã hóa dữ liệu hoặc file bị xóa hàng loạt bởi mã độc, dữ liệu sạch có thể được khôi phục từ bản sao lưu trước đó, hạn chế thất thoát cho doanh nghiệp.
* Công ty cấp mới hoặc nhân viên đổi sang thiết bị làm việc khác, các dữ liệu quan trọng đã sao lưu có thể được chuyển sang nhanh chóng và dễ dàng từ bản sao lưu.
Để sao lưu dữ liệu của doanh nghiệp, người dùng cần thiết lập kho lưu trữ. Các kho lưu trữ khả dụng gồm có AWS S3, Google Drive (sắp ra mắt).
Thực hiện theo hướng dẫn dưới đây để thiết lập kho lưu trữ, và bắt đầu sao lưu dữ liệu.
***
## Sao lưu với kho lưu trữ AWS S3
### Hướng dẫn cấu hình AWS cho CyStack Endpoint
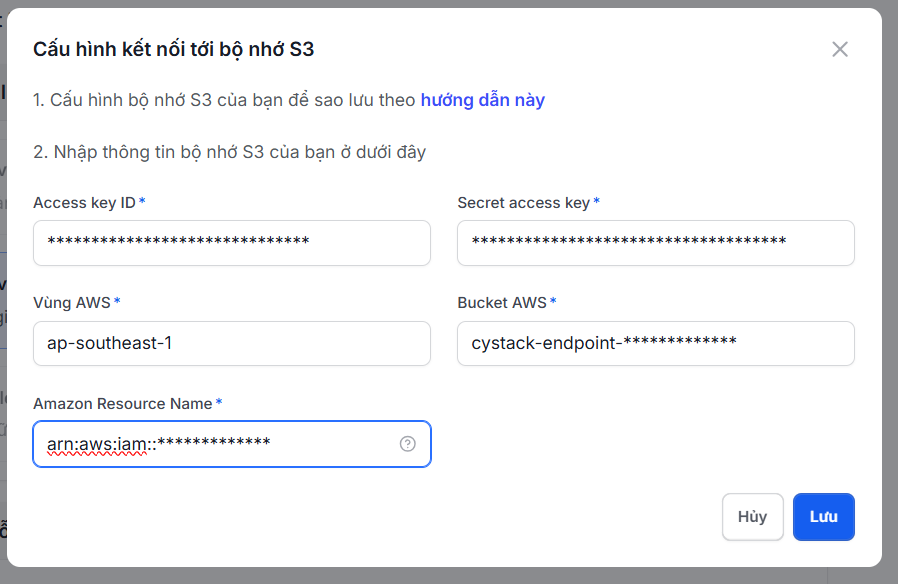
* Chuẩn bị trước account có quyền với các service IAM, S3. Sau đó tạo security key, sử dụng lệnh sau để cấu hình thông tin xác thực cho AWS CLI, giúp CLI có thể tương tác với các service AWS:
```bash theme={null}
aws configure
```
* Thay thế các biến như `[USER_NAME]`, `[REGION]`, `[ACCOUNT_ID]`, `[BUCKET_NAME]`, `[ROLE_NAME]`, `[POLICY_NAME]` thành giá trị của bạn.
#### 1. User
```bash theme={null}
aws iam create-user --user-name [USER_NAME]
```
```bash theme={null}
aws iam create-access-key --user-name [USER_NAME]
```
Lưu lại AccessKeyId và SecretAccessKey từ output:}>
```json theme={null}
{
"AccessKey": {
"AccessKeyId": "AKIA...",
"SecretAccessKey": "wJalrX...",
...
}
}
```
```bash theme={null}
aws iam get-user --user-name [USER_NAME]
```
```json theme={null}
{
"User": {
"Path": "/",
"UserName": "[USER_NAME]",
"UserId": "AIA...",
"Arn": "arn:aws:iam::[ACCOUNT_ID]:user/[USER_NAME]",
"CreateDate": "2025-04-22T04:30:31Z"
}
}
```
#### 2. Bucket
```bash theme={null}
aws s3 mb s3://[BUCKET_NAME]
```
```bash theme={null}
aws s3api put-bucket-versioning --bucket [BUCKET_NAME] --versioning-configuration Status=Enabled
```
Tạo file bucket-policy.json với nội dung sau: ()}>
giá trị AWS lấy từ user ARN được lưu bên trên
```json theme={null}
{
"Version": "2012-10-17",
"Id": "Policy1745394942216",
"Statement": [
{
"Sid": "Stmt1745394940328",
"Effect": "Allow",
"Principal": {
"AWS": "arn:aws:iam::[ACCOUNT_ID]:user/[USER_NAME]"
},
"Action": [
"s3:ListBucket",
"s3:ListBucketVersions"
],
"Resource": "arn:aws:s3:::[USER_NAME]"
}
]
}
```
```bash theme={null}
aws s3api put-bucket-policy --bucket [BUCKET_NAME] --policy file://bucket-policy.json --region [REGION]
```
#### 3. Tạo các role cần thiết
Tạo file trust-policy.json để cho phép user mới có quyền "assume role":}>
```json theme={null}
{
"Version": "2012-10-17",
"Statement": [
{
"Effect": "Allow",
"Principal": {
"AWS": "arn:aws:iam::[ACCOUNT_ID]:user/[USER_NAME]"
},
"Action": "sts:AssumeRole"
}
]
}
```
Tạo role để gọi AssumeRole. Role này sẽ có "IAM policy" tối thiểu, kết hợp với "session policy" để kiểm soát quyền:}>
```bash theme={null}
aws iam create-role ^
--role-name [ROLE_NAME] ^
--assume-role-policy-document file://trust-policy.json
```
```bash theme={null}
aws iam create-role \
--role-name [ROLE_NAME] \
--assume-role-policy-document file://trust-policy.json
```
Tạo file generic-backup-policy.json với "IAM policy" như sau:}>
```json theme={null}
{
"Version": "2012-10-17",
"Statement": [
{
"Effect": "Allow",
"Action": [
"s3:GetObject",
"s3:GetObjectAttributes",
"s3:GetObjectVersion",
"s3:PutObject",
"s3:ListBucket"
],
"Resource": [
"arn:aws:s3:::[BUCKET_NAME]",
"arn:aws:s3:::[BUCKET_NAME]/*"
]
}
]
}
```
```bash theme={null}
aws iam create-policy ^
--policy-name [POLICY_NAME] ^
--policy-document file://generic-backup-policy.json
```
```bash theme={null}
aws iam attach-role-policy ^
--role-name [ROLE_NAME] ^
--policy-arn arn:aws:iam::[ACCOUNT_ID]:policy/[POLICY_NAME]
```
```bash theme={null}
aws iam create-policy \
--policy-name [POLICY_NAME] \
--policy-document file://generic-backup-policy.json
```
```bash theme={null}
aws iam attach-role-policy \
--role-name [ROLE_NAME] \
--policy-arn arn:aws:iam::[ACCOUNT_ID]:policy/[POLICY_NAME]
```
Tạo file central-server-policy.json:}>
```json theme={null}
{
"Version": "2012-10-17",
"Statement": [
{
"Effect": "Allow",
"Action": "sts:AssumeRole",
"Resource": "arn:aws:iam::[ACCOUNT_ID]:role/[ROLE_NAME]"
}
]
}
```
Gán policy cho phép user mới gọi AssumeRole trên [ROLE_NAME]:}>
```bash theme={null}
aws iam put-user-policy ^
--user-name [USER_NAME] ^
--policy-name STSPolicy ^
--policy-document file://central-server-policy.json
```
```bash theme={null}
aws iam put-user-policy \
--user-name [USER_NAME] \
--policy-name STSPolicy \
--policy-document file://central-server-policy.json
```
#### 4. Thiết lập kết nối từ CyStack Endpoint đến kho lưu trữ
Trên giao diện quản lý CyStack Endpoint, truy cập tab "Bảo vệ dữ liệu" {'\u2192'} "Cài đặt sao lưu".} />
Tại danh sách "Bộ nhớ sao lưu", chọn "Dịch vụ lưu trữ S3":}>
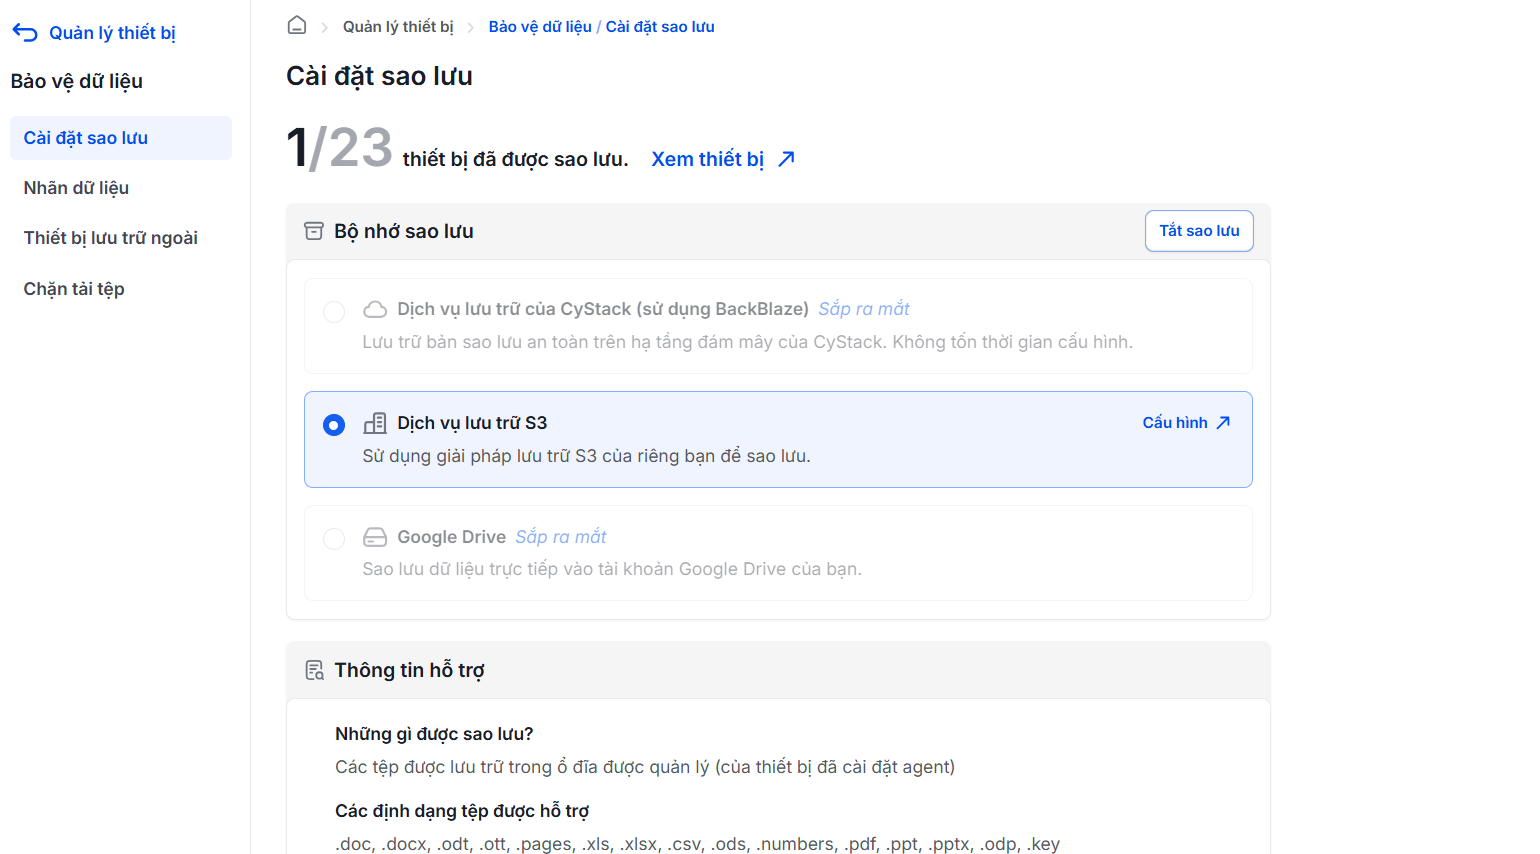 Tại cửa sổ bật lên xuất hiện, điền thông tin lấy được từ việc thiết lập cấu hình vào, và bấm
 Lưu:}>
 Sau khi thiết lập kết nối thành công, chuyển sang tab danh sách "Thiết bị" {'\u2192'} Bấm vào checkbox tương ứng với thiết bị muốn sao lưu {'\u2192'} bấm nút
 Bật sao lưu:}>
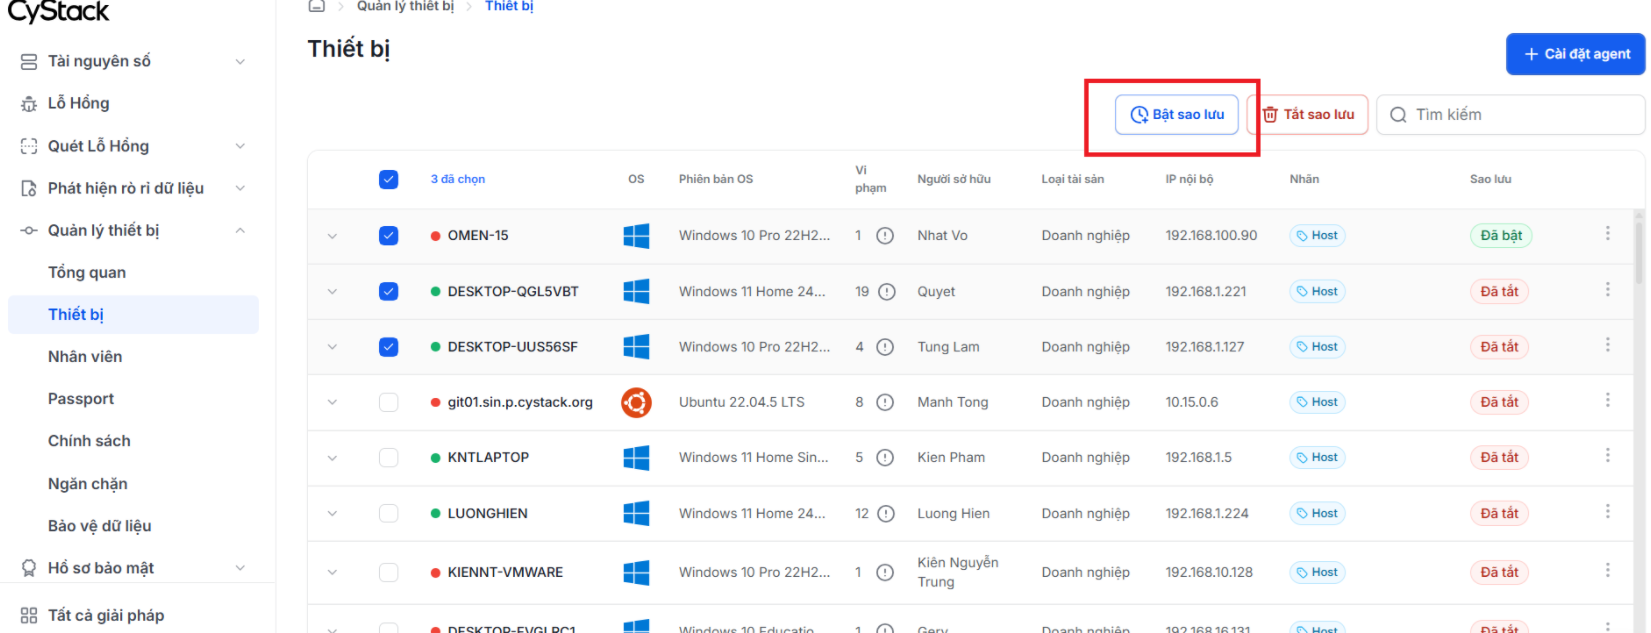 Dữ liệu thuộc ổ đĩa doanh nghiệp trên các thiết bị đã chọn sẽ được tự động sao lưu 6 tiếng một lần. Việc sao lưu áp dụng với các loại file sau:
`.doc`, `.docx`, `.odt`, `.ott`, `.pages`, `.xls`, `.xlsx`, `.csv`, `.ods`, `.numbers`, `.pdf`, `.ppt`, `.pptx`, `.odp`, `.key`
***
## Khôi phục dữ liệu
Khi thiết bị xảy ra lỗi, hoặc mất dữ liệu bởi ransomware, người dùng doanh nghiệp có thể yêu cầu Chủ sỡ hữu workspace hoặc Quản trị viên khôi phục dữ liệu trong thiết bị của mình. Khi đó, Chủ sở hữu hoặc Quản trị viên khôi phục dữ liệu theo hướng dẫn sau:
Bấm vào biểu tượng
Dữ liệu thuộc ổ đĩa doanh nghiệp trên các thiết bị đã chọn sẽ được tự động sao lưu 6 tiếng một lần. Việc sao lưu áp dụng với các loại file sau:
`.doc`, `.docx`, `.odt`, `.ott`, `.pages`, `.xls`, `.xlsx`, `.csv`, `.ods`, `.numbers`, `.pdf`, `.ppt`, `.pptx`, `.odp`, `.key`
***
## Khôi phục dữ liệu
Khi thiết bị xảy ra lỗi, hoặc mất dữ liệu bởi ransomware, người dùng doanh nghiệp có thể yêu cầu Chủ sỡ hữu workspace hoặc Quản trị viên khôi phục dữ liệu trong thiết bị của mình. Khi đó, Chủ sở hữu hoặc Quản trị viên khôi phục dữ liệu theo hướng dẫn sau:
Bấm vào biểu tượng {'\u22EE'} cạnh thiết bị cần được sao lưu dữ liệu, và chọn Quản lý bản sao lưu:}>
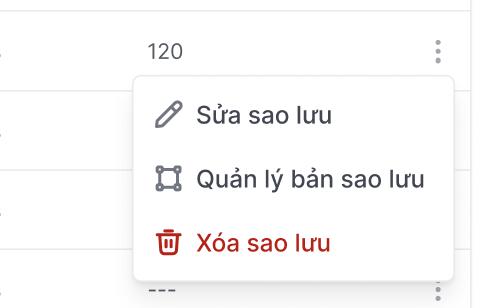 Tại hộp thoại "Quản lý bản sao", chọn nút
 Khôi phục:}>
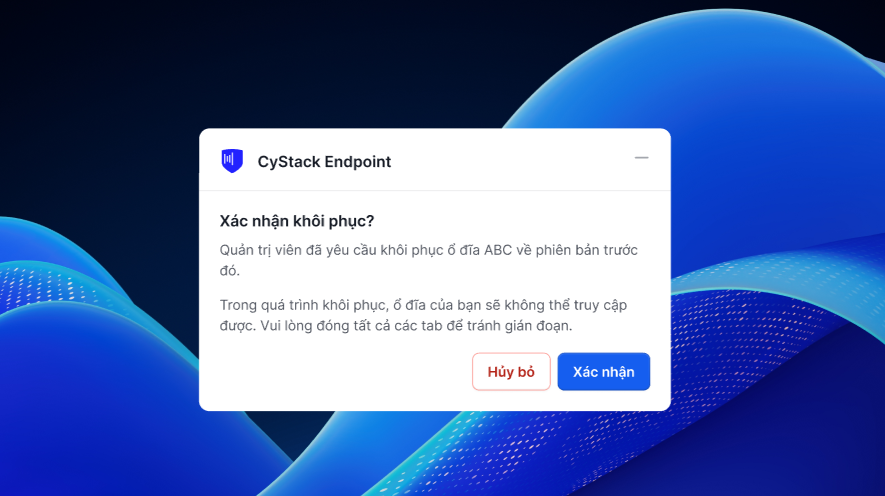
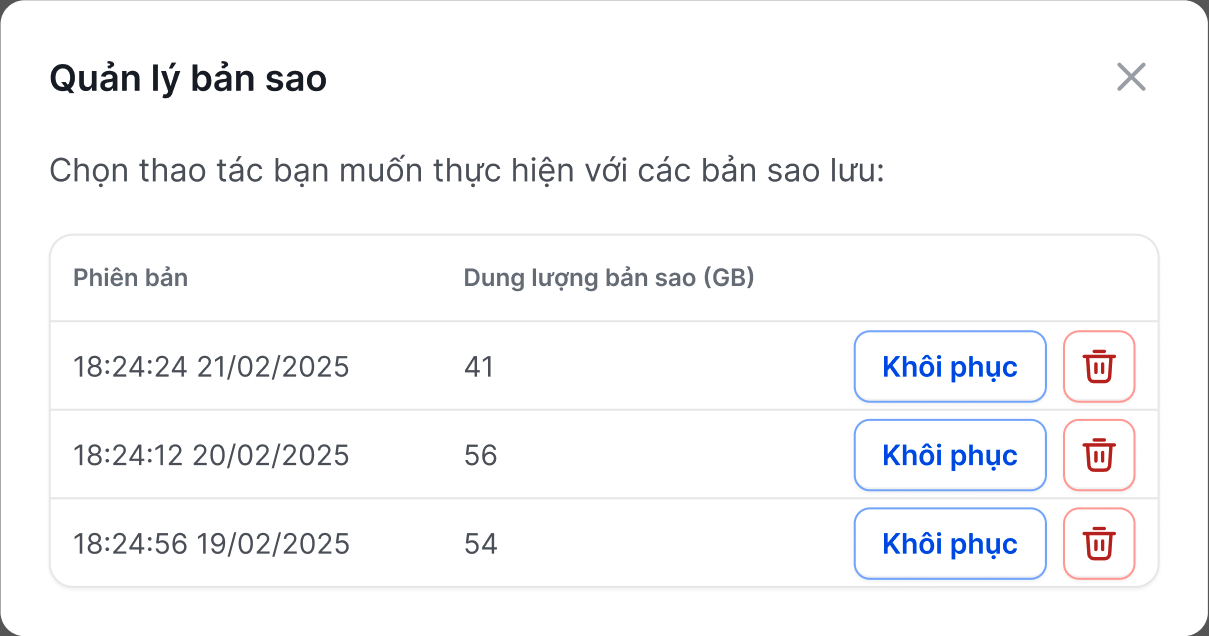 Hệ thống sẽ yêu cầu người dùng thiết bị xác nhận yêu cầu khôi phục dữ liệu.} />
Trên thiết bị của mình, người dùng bấm nút
Hệ thống sẽ yêu cầu người dùng thiết bị xác nhận yêu cầu khôi phục dữ liệu.} />
Trên thiết bị của mình, người dùng bấm nút Xác nhận:}>
 Trong một số trường hợp (trên hệ điều hành Windows), người dùng thiết bị cần nhập khóa BitLocker (đã lưu trước đó) để giải mã dữ liệu sau khi khôi phục:}>
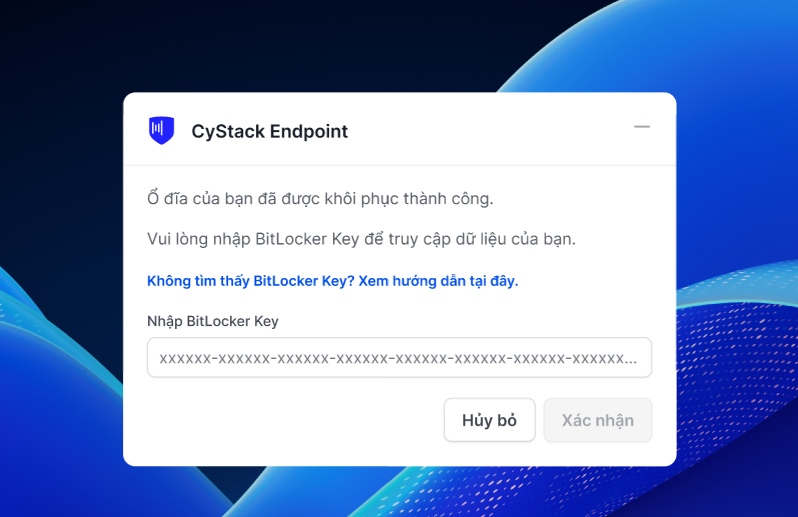 Sau khi khôi phục thành công, người dùng có thể truy cập được dữ liệu trên ổ đĩa của thiết bị.} />