> ## Documentation Index
> Fetch the complete documentation index at: https://docs.cystack.net/llms.txt
> Use this file to discover all available pages before exploring further.
# Add & verify sites
> Declare the sites you want to protect, configure origins, point DNS to the edge nodes, and verify
Once you have at least one ready [edge node](/en/vulnscan/waf-nodes), the next step is to declare the **sites** you want the WAF to protect. Each site is a domain tied to one or more **origins** (origin servers). VulnScan guides you through a three-step wizard, then requires you to **verify** ownership via DNS before any rule takes effect.
 ## Add a site
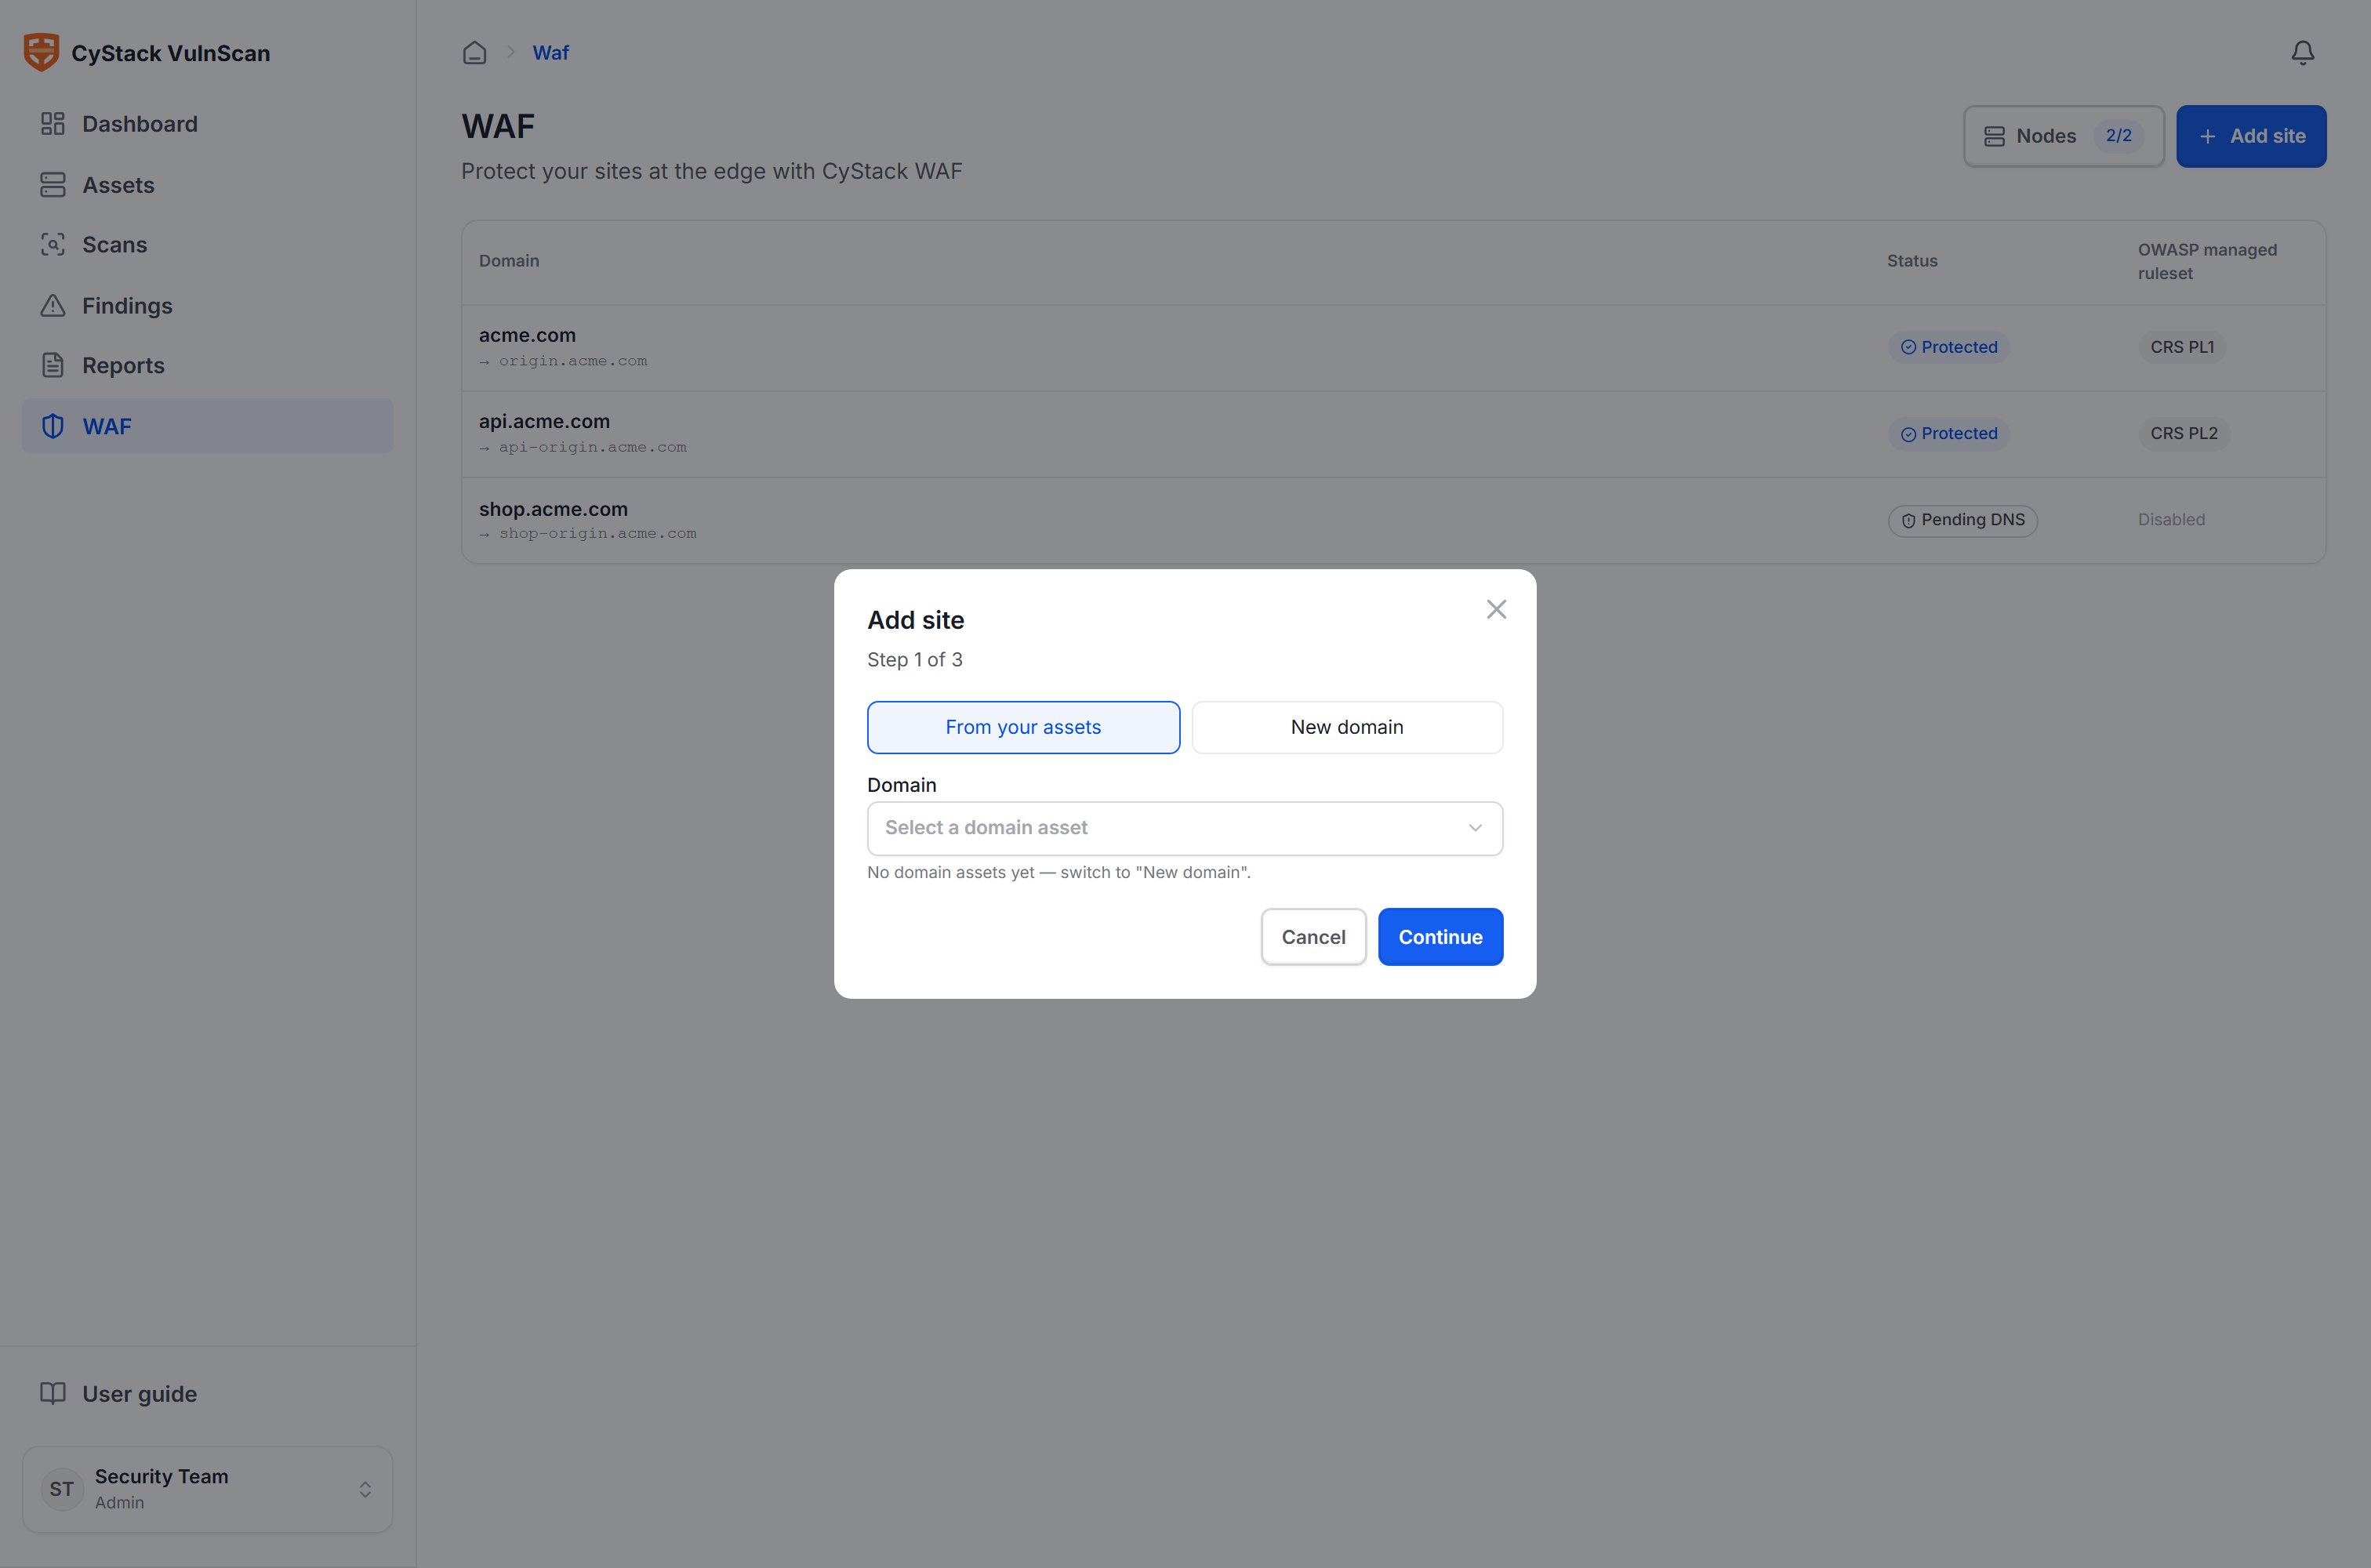
Open the **WAF** section and select **Add site**. The wizard has three steps:
### Step 1 — Choose a domain
Select a domain already in your asset list, or enter a **new domain**. The system validates the domain format and detects duplicates. The example used throughout this documentation is `acme.com`.
### Step 2 — Configure the origin
VulnScan resolves the domain's current DNS records to suggest an origin. The origin is where the node will forward valid requests — typically the application's internal IP or hostname, for example `origin.acme.com`.
* You can edit or add multiple origins manually.
* The **Test origin** button attempts a connection to the origin from the console and reports the protocol (HTTP/HTTPS), status code, and certificate validity.
* The system warns you if the domain is currently being proxied through another service, to avoid creating a loop.
Use a dedicated origin (for example `origin.acme.com`) that points straight to the origin server, rather than pointing back to the public domain that the WAF is protecting. This avoids traffic looping back through the node.
### Step 3 — Point DNS and verify
The console provides a **managed domain** in the form `vs-
## Add a site
Open the **WAF** section and select **Add site**. The wizard has three steps:
### Step 1 — Choose a domain
Select a domain already in your asset list, or enter a **new domain**. The system validates the domain format and detects duplicates. The example used throughout this documentation is `acme.com`.
### Step 2 — Configure the origin
VulnScan resolves the domain's current DNS records to suggest an origin. The origin is where the node will forward valid requests — typically the application's internal IP or hostname, for example `origin.acme.com`.
* You can edit or add multiple origins manually.
* The **Test origin** button attempts a connection to the origin from the console and reports the protocol (HTTP/HTTPS), status code, and certificate validity.
* The system warns you if the domain is currently being proxied through another service, to avoid creating a loop.
Use a dedicated origin (for example `origin.acme.com`) that points straight to the origin server, rather than pointing back to the public domain that the WAF is protecting. This avoids traffic looping back through the node.
### Step 3 — Point DNS and verify
The console provides a **managed domain** in the form `vs-.cystack.io` (for example `vs-7f3a9.cystack.io`). Update your domain's DNS to route traffic through the edge nodes, using one of two methods:
| DNS method | Record | When to use |
| ------------------------------- | -------------------------------------- | --------------------------------------------------------------------------------------- |
| **CNAME to the managed domain** | `CNAME acme.com → vs-7f3a9.cystack.io` | The recommended method; works even when the domain sits behind another DNS/CDN service. |
| **A record to a node IP** | `A acme.com → 203.0.113.10` | When you want to point directly to the public IP of an edge node. |
After updating DNS, select **Verify**. VulnScan resolves the domain and checks that it points to the node's IP (via the A record) or to the managed domain (via the CNAME). When verification succeeds:
* The site moves to the **Protected** state and unlocks rule configuration.
* The domain is added to the asset list if it is still within the license scope.
* The system automatically re-checks periodically while a site is unverified.
## Site status
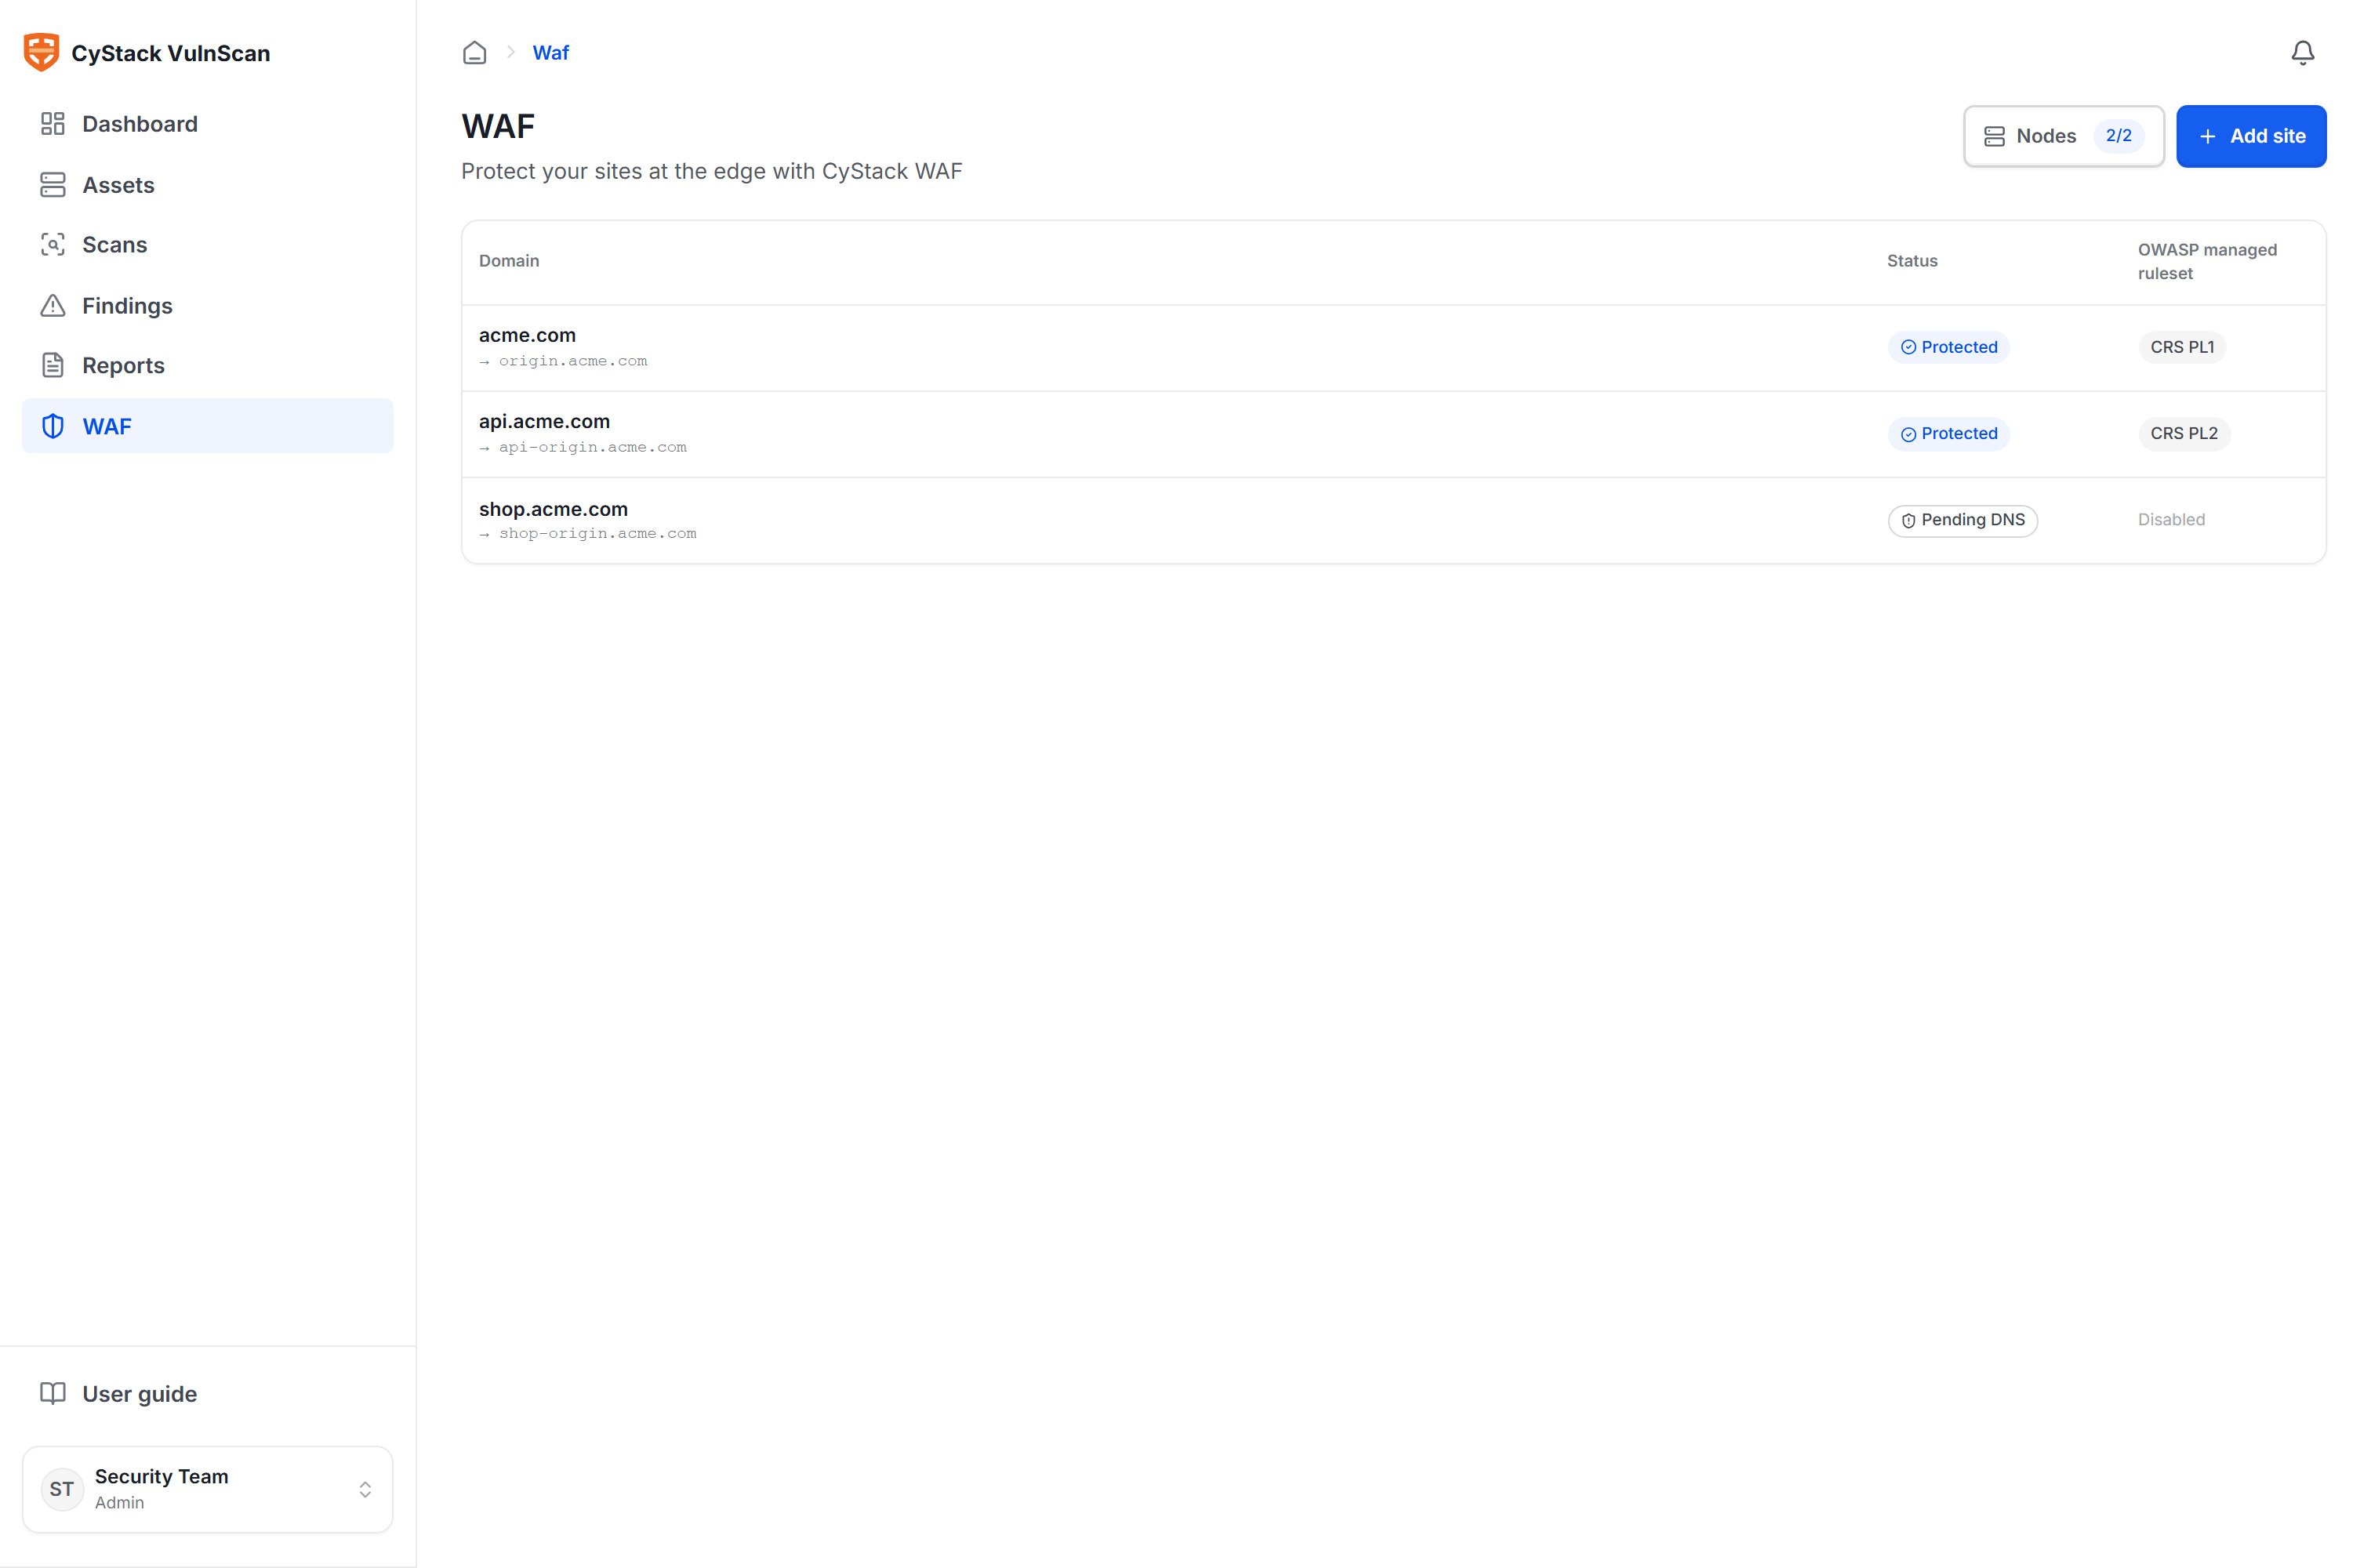
The site list shows the aggregated operational status of each domain:
 | Status | Meaning |
| --------------- | ------------------------------------------------------------------------------------------------------------- |
| **Protected** | DNS is pointed correctly, the node can serve the site, the origin is reachable, and the certificate is valid. |
| **Pending DNS** | The site was created but DNS is not yet verified; rules are not yet in effect. |
| **Warning** | DNS is verified, but a node cannot reach the origin or there is a certificate problem. |
| **Down** | No ready node is available to serve the site. |
The ruleset column indicates which paranoia level of the managed OWASP ruleset the site has enabled (for example `CRS PL1`), or whether it is turned off.
## Site configuration
Open a site and go to the **Settings** section to adjust:
| Status | Meaning |
| --------------- | ------------------------------------------------------------------------------------------------------------- |
| **Protected** | DNS is pointed correctly, the node can serve the site, the origin is reachable, and the certificate is valid. |
| **Pending DNS** | The site was created but DNS is not yet verified; rules are not yet in effect. |
| **Warning** | DNS is verified, but a node cannot reach the origin or there is a certificate problem. |
| **Down** | No ready node is available to serve the site. |
The ruleset column indicates which paranoia level of the managed OWASP ruleset the site has enabled (for example `CRS PL1`), or whether it is turned off.
## Site configuration
Open a site and go to the **Settings** section to adjust:
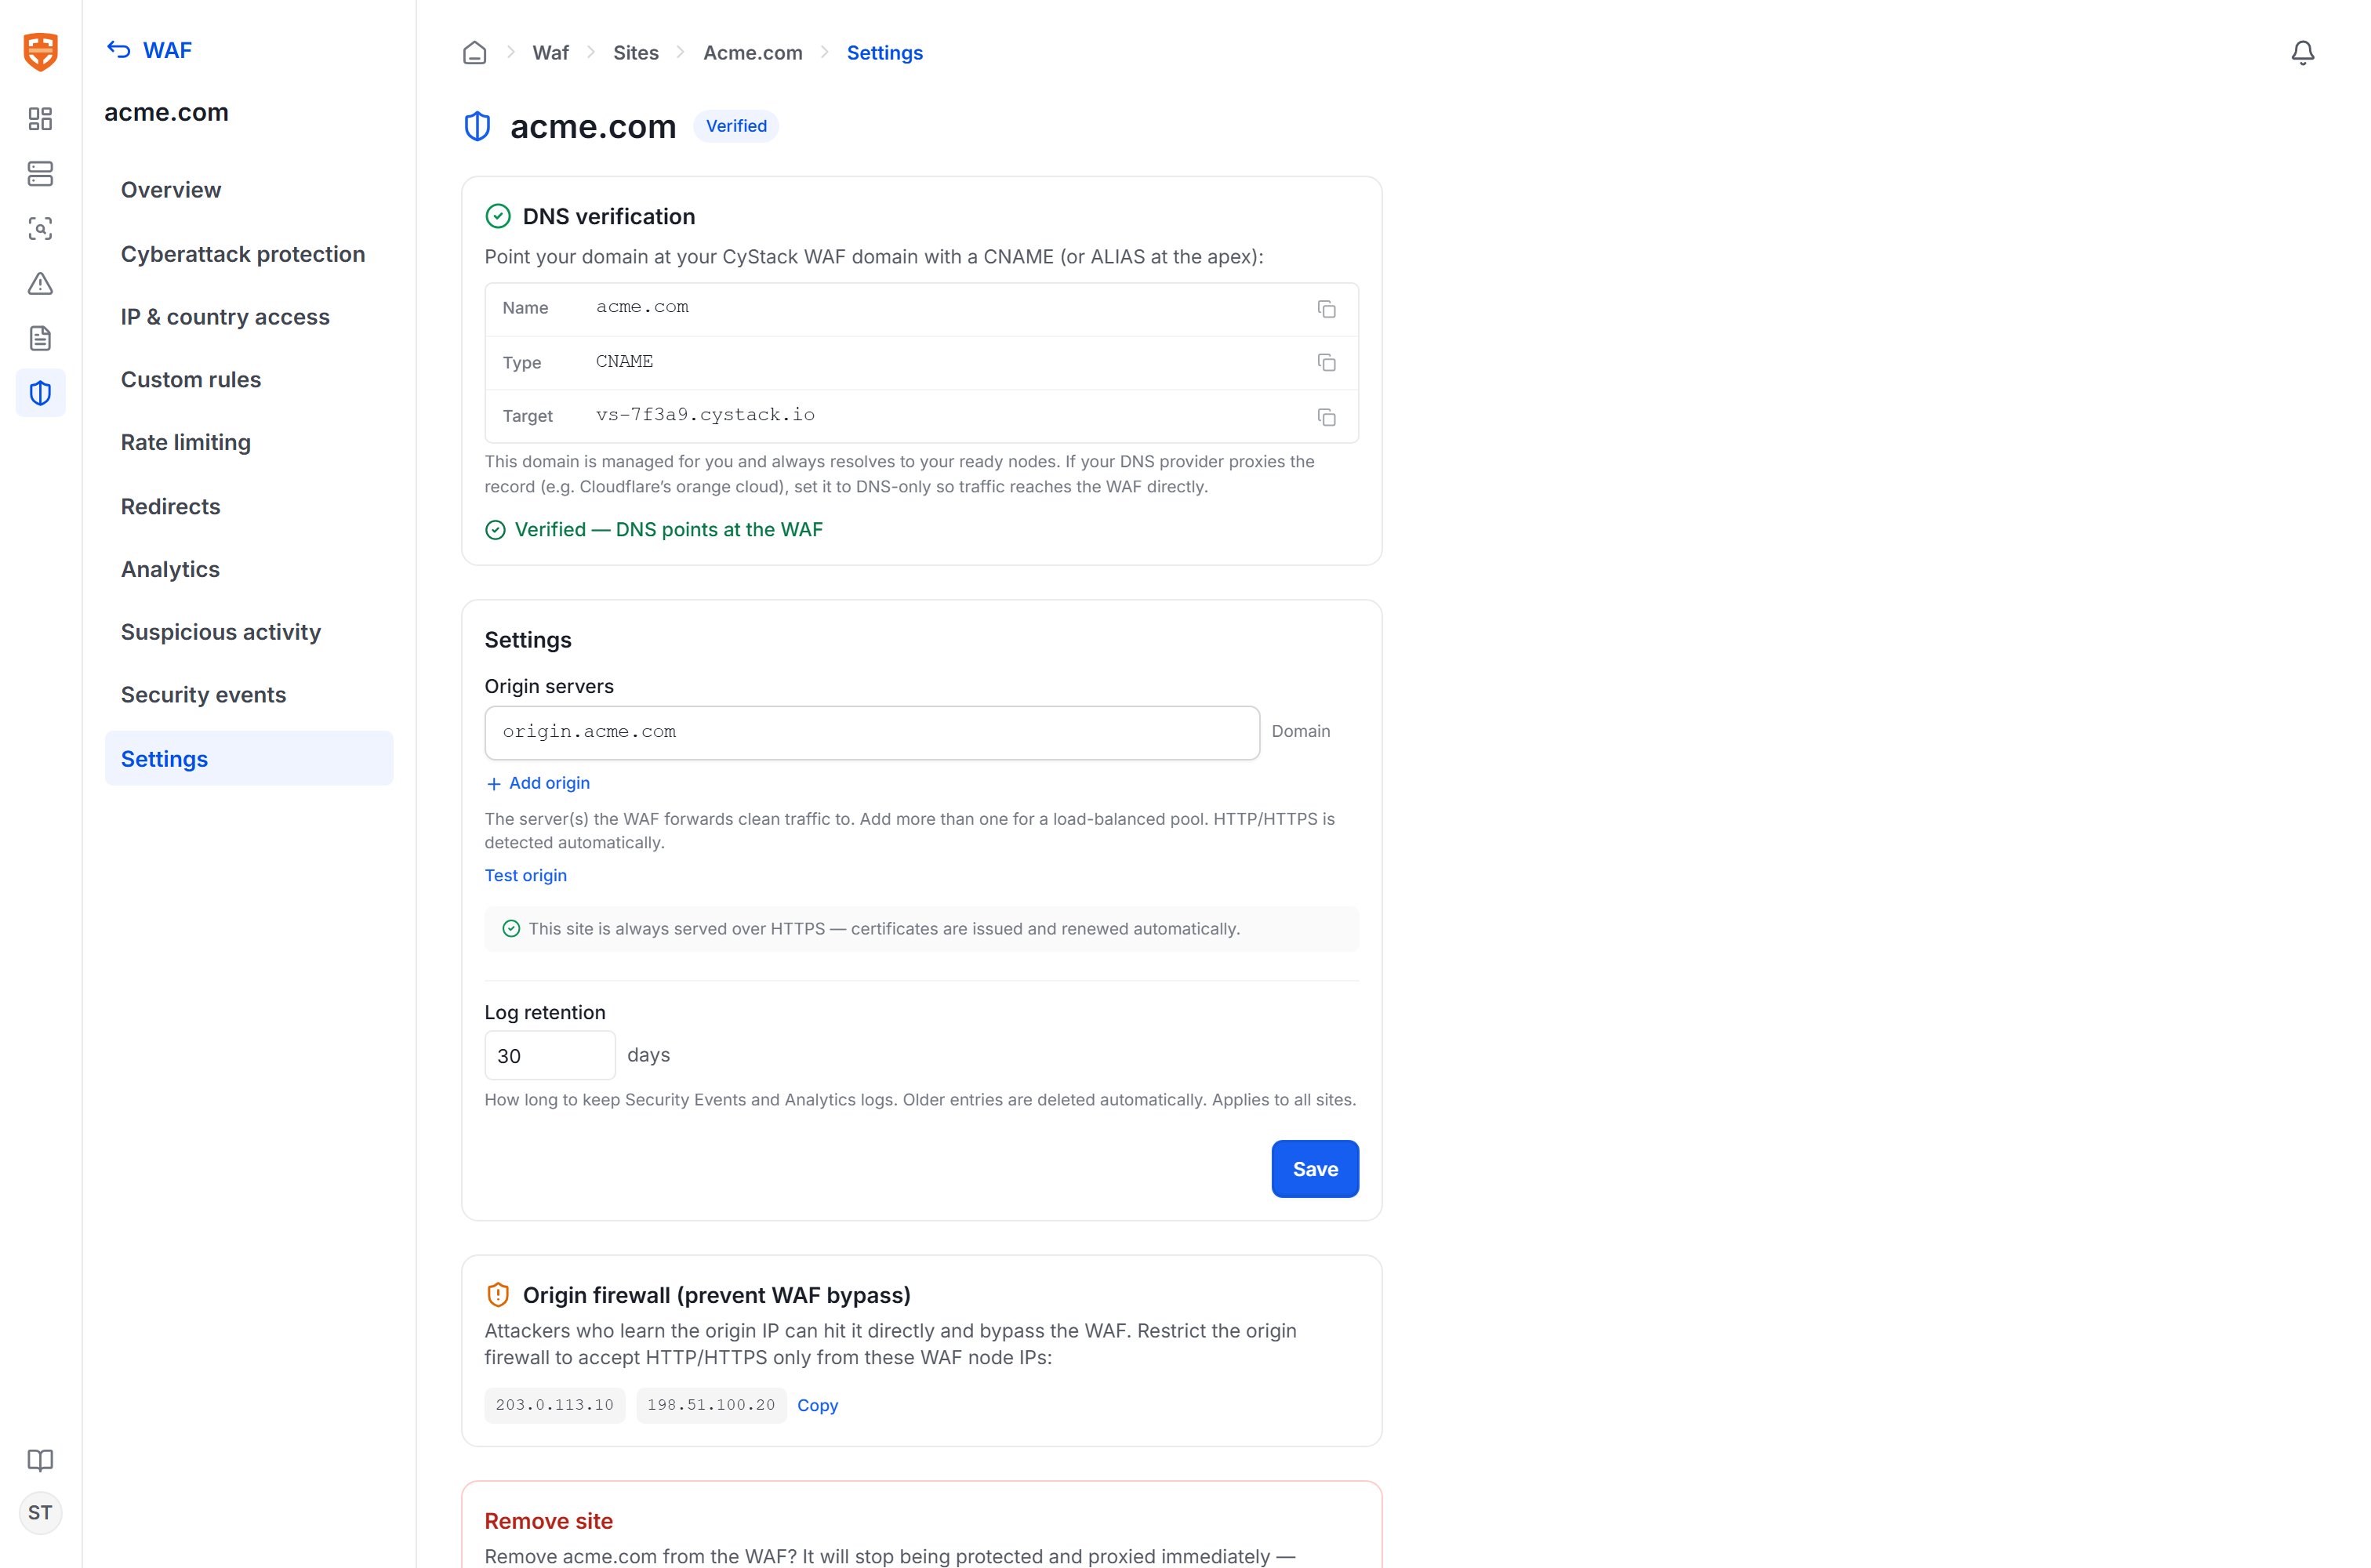 * **Domain**: changing it requires re-verification.
* **Origin**: add or remove origin servers.
* **Enable/disable site**: pause protection without deleting the configuration.
* **TLS**: choose how HTTP/HTTPS is handled.
* **Re-verify**: check DNS manually and view the most recent verification time along with node status.
## After verification
Once a site is in the **Protected** state, continue with:
* [Protection rules](/en/vulnscan/waf-rules) — enable the OWASP ruleset and add custom rules.
* [Access & traffic control](/en/vulnscan/waf-access) — block by IP/country, rate limiting, redirects.
* [Monitoring & analytics](/en/vulnscan/waf-monitoring) — track events and traffic.
* **Domain**: changing it requires re-verification.
* **Origin**: add or remove origin servers.
* **Enable/disable site**: pause protection without deleting the configuration.
* **TLS**: choose how HTTP/HTTPS is handled.
* **Re-verify**: check DNS manually and view the most recent verification time along with node status.
## After verification
Once a site is in the **Protected** state, continue with:
* [Protection rules](/en/vulnscan/waf-rules) — enable the OWASP ruleset and add custom rules.
* [Access & traffic control](/en/vulnscan/waf-access) — block by IP/country, rate limiting, redirects.
* [Monitoring & analytics](/en/vulnscan/waf-monitoring) — track events and traffic.