> ## Documentation Index
> Fetch the complete documentation index at: https://docs.cystack.net/llms.txt
> Use this file to discover all available pages before exploring further.
# Endpoint Server Installation
> Deploying Endpoint on a server (Self-hosted edition)
Enterprises can deploy and manage CyStack Endpoint software on their own infrastructure by following the instructions below.
**Note**: Currently, Endpoint Server only supports Linux.
***
## System Requirements
**General Notes**:
* The server needs a public IP address.
* Do not press Ctrl+C during the installation process.
* Open the ports to connect to CyStack API: 80, 443, 9900.
### Managing fewer than 100 devices
If system dependencies (Redis, MySQL) are installed directly on the server, the following minimum specifications are required:
| **Server Count** | **CPU (cores)** | **RAM** | **Storage (SSD)** |
| ---------------- | --------------- | ------- | ----------------- |
| 1 | 2 | 4GB | 75GB |
### Managing 100–1000 devices
**Scenario 1**: If system dependencies (Redis, MySQL) are installed directly on the server, the following minimum specifications are required:
| Server Count | CPU (cores) | RAM | Storage (SSD) |
| ------------ | ----------- | ----- | ------------- |
| 1 | 16 | 18 GB | 200 – 300 GB |
**Scenario 2**: If system dependencies (Redis, MySQL) are deployed within containers, the minimum container configuration requirements are as follows:
| Component | Container Count | CPU/Container | RAM/Container | Storage (SSD) |
| ------------------------- | --------------- | ------------- | ------------- | ------------- |
| Fleet | 1 | 1 | 4 GB | - |
| Redis 6 | 3 | 2 | 2 GB | - |
| MySQL 8.0 (Aurora 3.07.1) | 2 | 2 | 5 GB | 10 GB |
***
## Installation
The installation process for CyStack Endpoint can be automated using the **endpointCtl** binary utility.
```bash theme={null}
mkdir -p ~/endpoint && cd ~/endpoint
wget https://d.cystack.net/endpointctl/endpointctl
ls -l
```

 ```bash theme={null}
chmod +x endpointctl
```
```bash theme={null}
./endpointctl start
```
Enter the root password when prompted. The installation process typically takes 1–3 minutes.
**Option 1:** Use default configuration
* The system will automatically create the database; no user intervention is required.
* Input `1` and press `Enter`.
```bash theme={null}
chmod +x endpointctl
```
```bash theme={null}
./endpointctl start
```
Enter the root password when prompted. The installation process typically takes 1–3 minutes.
**Option 1:** Use default configuration
* The system will automatically create the database; no user intervention is required.
* Input `1` and press `Enter`.
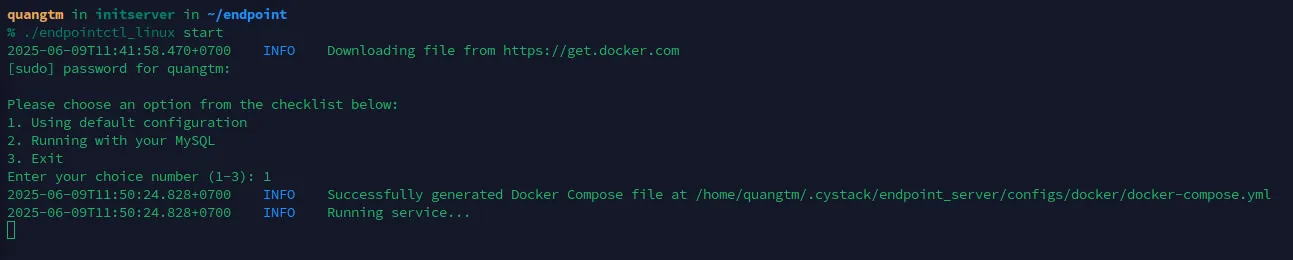 **Option 2:** Use existing
 MySQL installation
* Input 2 and press Enter.
* Have the following information ready:
| Field | Example |
| ----------------------------------- | ------------------------------------------- |
| MySQL Host | localhost |
| MySQL Port | 3306 |
| Database/User/Password for services | ces\_fleet / ces\_api / ces\_data\_labeling |
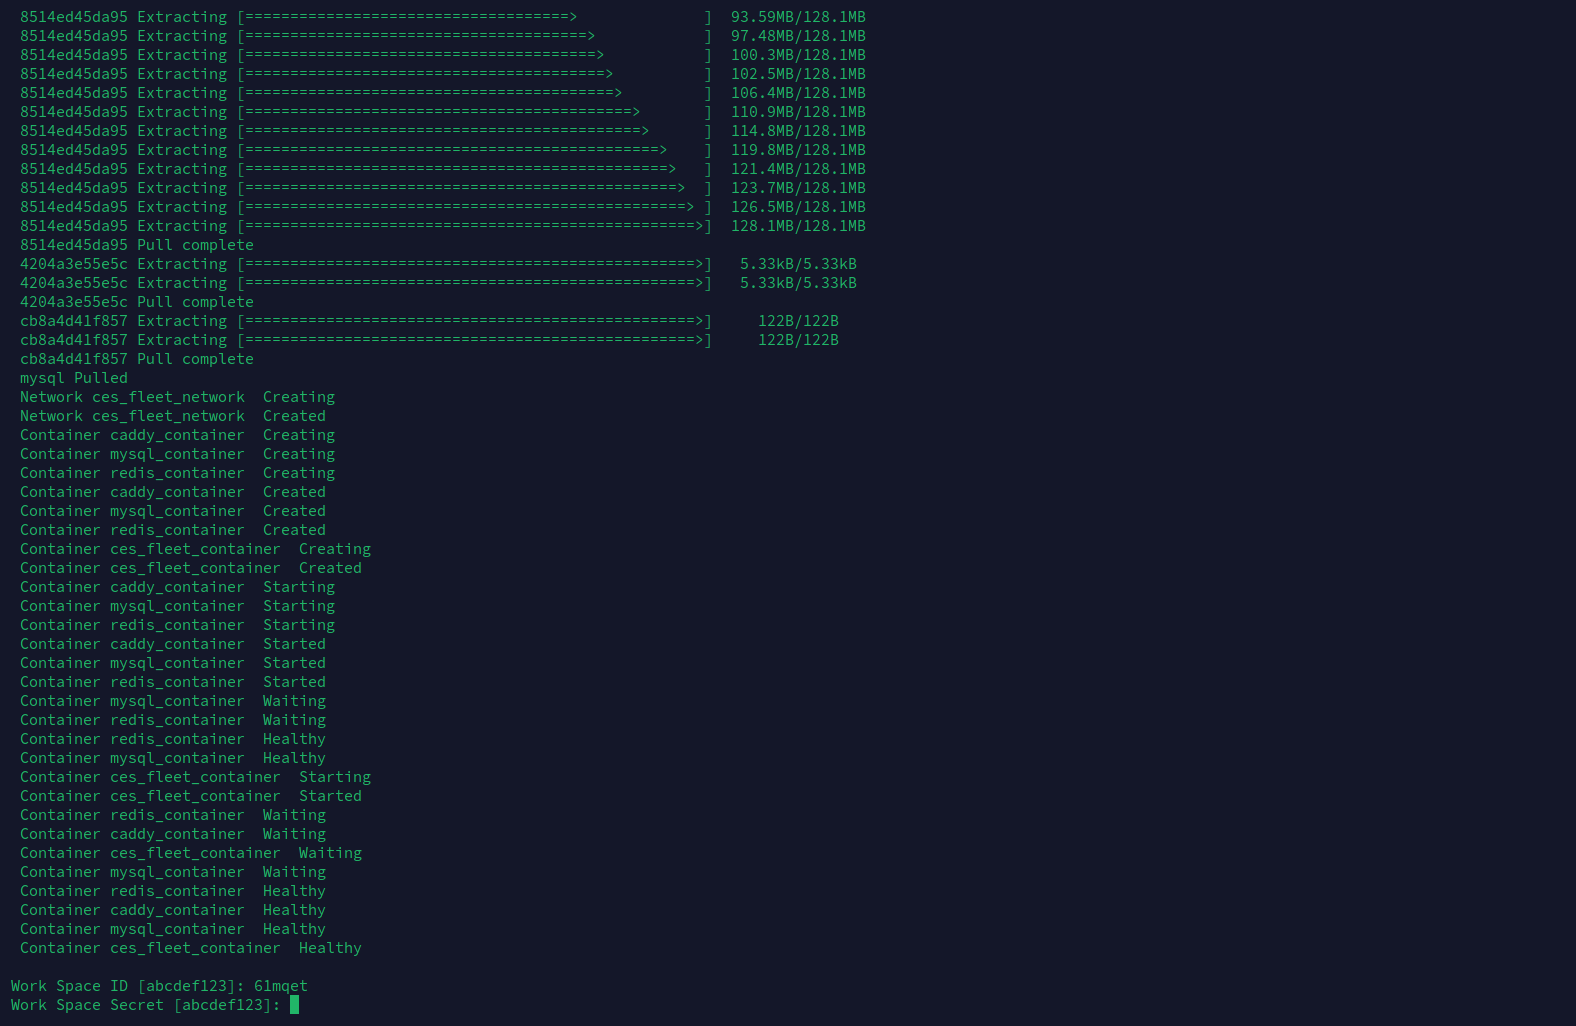
After MySQL is configured, the system will request the following details:
```
Work Space ID
Work Space Secret
```
(These credentials will be provided by CyStack).
Estimated completion time: 3–10 minutes (depending on server specifications).
Upon completion, the program will display a list of active services.
 ✅ Verify the agent file
Upon completion, the agent file is generated automatically:
```bash theme={null}
cystack-endpoint__amd64.deb
```
✅ Configure automatic updates
Run the following command:
```
nohup ./endpointctl update > endpoint_updater.log 2>&1 &
```
***
## Using endpointctl
### Command Reference
| Command | Description |
| ------------------------------ | ---------------------------------------------------------------------------------------- |
| `./endpointctl start` | Install Endpoint. Append `--config` (path to config file) or `--re-config` to reinstall. |
| `./endpointctl stop` | Stop all services. |
| `./endpointctl status` | Check the status of all services. |
| `./endpointctl backup` | Create a `.zip` backup of the database in `~/.cystack/endpoint_server/backupdb/`. |
| `./endpointctl restore ` | Restore the database from a `.zip` file. |
| `./endpointctl update` | Perform daily automatic updates. Can be run in the background using `nohup`. |
### Troubleshooting
#### ❌ Container reports “Unhealthy” status
* **Cause**: Insufficient server resources or database configuration errors.
* **Resolution**:
* Check container logs:
```bash theme={null}
docker logs -f ces_fleet_container
```
* If migration is complete {'\u2192'} Restart the process:
```bash theme={null}
./endpointctl start --re-config
```
* If database errors persist {'\u2192'} Delete the config and reinstall from scratch.
#### ⚠️ Missing configuration error
{'\u2192'} Run `./endpointctl start` to generate the root configuration file, then edit and reuse it.
#### ⚙️ Backup process takes too long
{'\u2192'} This is typically due to limited server resources. Please wait patiently for the process to complete.
#### 🔑 Token retrieval error
{'\u2192'} Please contact **CyStack Support**.
#### 🌐 Domain Error (Caddy)
* Check the logs:
```bash theme={null}
docker logs -f caddy_container
```
* If:
* The domain does not point to the correct IP {'\u2192'} Update DNS records.
* The domain has reached SSL limits {'\u2192'} Switch to a different domain.
✅ Verify the agent file
Upon completion, the agent file is generated automatically:
```bash theme={null}
cystack-endpoint__amd64.deb
```
✅ Configure automatic updates
Run the following command:
```
nohup ./endpointctl update > endpoint_updater.log 2>&1 &
```
***
## Using endpointctl
### Command Reference
| Command | Description |
| ------------------------------ | ---------------------------------------------------------------------------------------- |
| `./endpointctl start` | Install Endpoint. Append `--config` (path to config file) or `--re-config` to reinstall. |
| `./endpointctl stop` | Stop all services. |
| `./endpointctl status` | Check the status of all services. |
| `./endpointctl backup` | Create a `.zip` backup of the database in `~/.cystack/endpoint_server/backupdb/`. |
| `./endpointctl restore ` | Restore the database from a `.zip` file. |
| `./endpointctl update` | Perform daily automatic updates. Can be run in the background using `nohup`. |
### Troubleshooting
#### ❌ Container reports “Unhealthy” status
* **Cause**: Insufficient server resources or database configuration errors.
* **Resolution**:
* Check container logs:
```bash theme={null}
docker logs -f ces_fleet_container
```
* If migration is complete {'\u2192'} Restart the process:
```bash theme={null}
./endpointctl start --re-config
```
* If database errors persist {'\u2192'} Delete the config and reinstall from scratch.
#### ⚠️ Missing configuration error
{'\u2192'} Run `./endpointctl start` to generate the root configuration file, then edit and reuse it.
#### ⚙️ Backup process takes too long
{'\u2192'} This is typically due to limited server resources. Please wait patiently for the process to complete.
#### 🔑 Token retrieval error
{'\u2192'} Please contact **CyStack Support**.
#### 🌐 Domain Error (Caddy)
* Check the logs:
```bash theme={null}
docker logs -f caddy_container
```
* If:
* The domain does not point to the correct IP {'\u2192'} Update DNS records.
* The domain has reached SSL limits {'\u2192'} Switch to a different domain.